Simple traffic light
Description
This project is an Arduino traffic light simulator built with a push button, a buzzer, and three LEDs: red, yellow, and green. The system continuously repeats a traffic light sequence, keeping the red light on for 10 seconds, the green light on for 5 seconds, and the yellow light on for 2 seconds. During the green and yellow phases, the buzzer produces acoustic signals with different rhythms. The push button is checked during the red phase and can modify the timing of the sequence. This project is useful for learning digital inputs, INPUT_PULLUP logic, LED control, buzzer tones, timing with millis(), and basic traffic light automation.
Required components:
- 1x Arduino UNO
- 1x Traffic light module (or 3x LEDs of three different colors)
- 1x Button
- 1x Passive buzzer
- Jumper Cables (and optional breadboard)
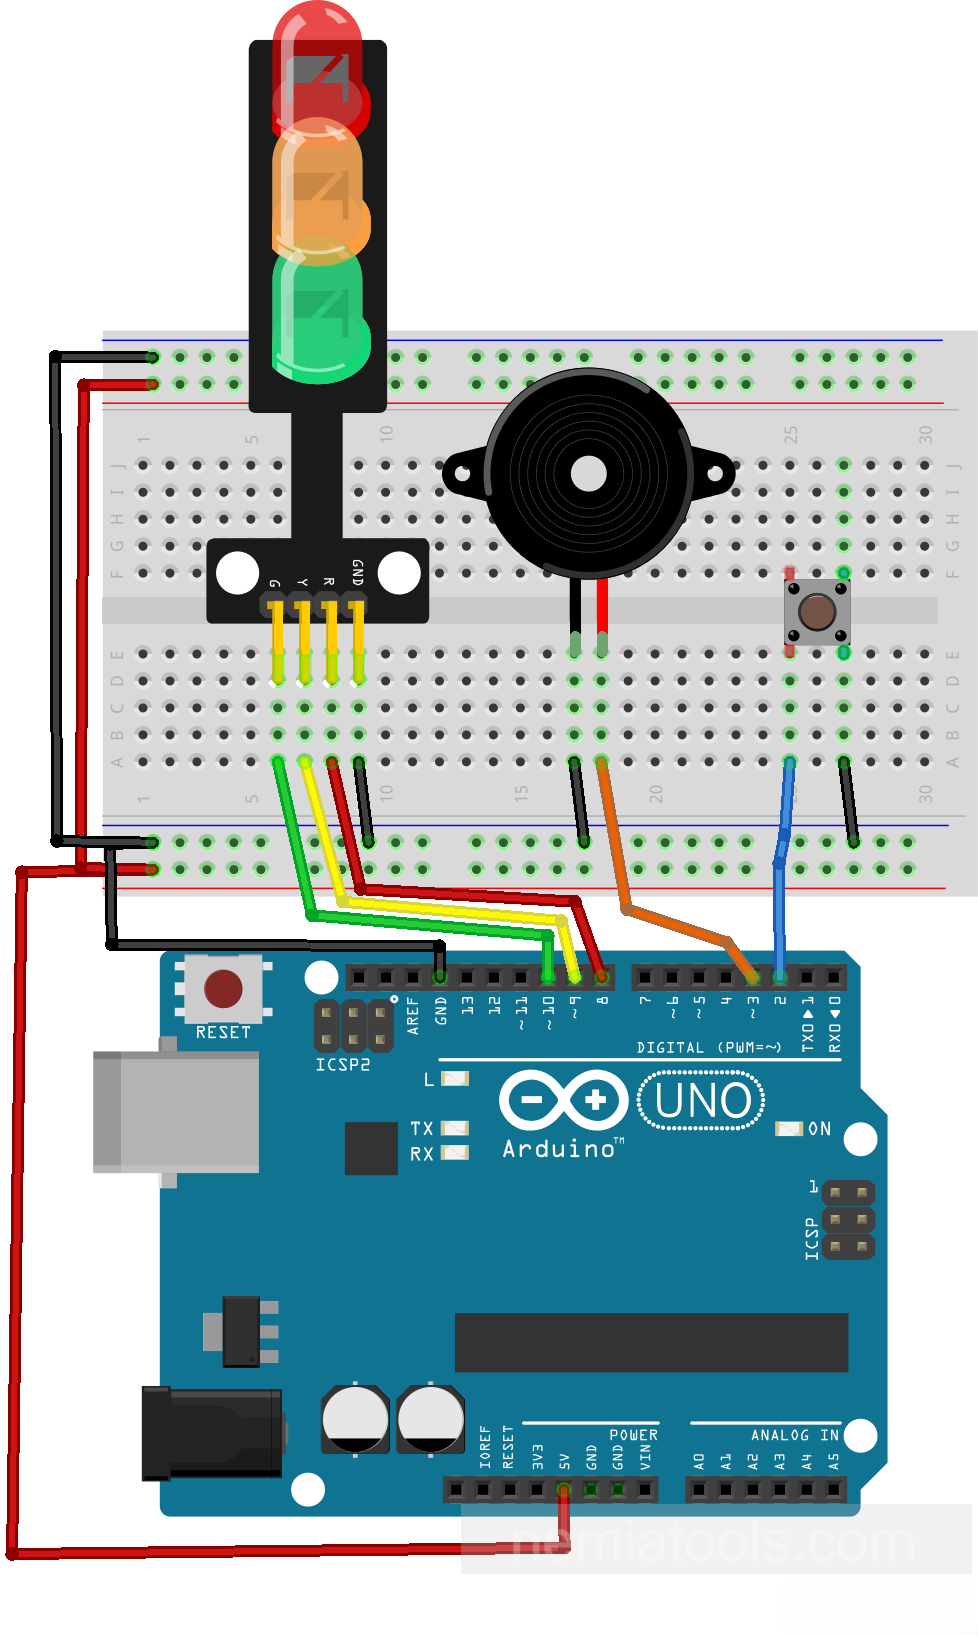
Schematic:
CODE:
// https://nemiatools.com
#define pinButton 2 // Button pin
#define pinBuzzer 3 // Buzzer pin
#define pinRed 8    // Red LED pin
#define pinYellow 9 // Yellow LED pin
#define pinGreen 10 // Green LED pin

unsigned long redDuration = 10000;     // Red light duration
unsigned long yellowDuration = 2000;   // Yellow light duration
unsigned long greenDuration = 5000;    // Green light duration

void red(){  // Red light routine
  bool buttonPressed = false;   // Button flag
  unsigned long start = millis();   // Store start time
  while(millis() < start + redDuration) {   // Wait red time
    digitalWrite(pinRed, HIGH);  // Turn red on
    if(digitalRead(pinButton) == LOW && !buttonPressed && millis() < start + redDuration - 2000){  // Check early press
      start -= 2000;  // Extend red time
      buttonPressed = true;  // Mark button used
    }
  }
    digitalWrite(pinRed, LOW);  // Turn red off
}

void yellow(){  // Yellow light routine
  unsigned long start = millis(); // Store start time
  while(millis() < start + yellowDuration) {  // Wait yellow time
    digitalWrite(pinYellow, HIGH); // Turn yellow on
    tone(pinBuzzer, 1000);  // Start buzzer tone
    delay(100);  // Short beep delay
    noTone(pinBuzzer);  // Stop buzzer tone
    delay(200);  // Pause between beeps
  }
    digitalWrite(pinYellow, LOW);  // Turn yellow off
}

void green(){  // Green light routine
  unsigned long start = millis();  // Store start time
  while(millis() < start + greenDuration) { // Wait green time
    digitalWrite(pinGreen, HIGH);  // Turn green on
    tone(pinBuzzer, 1000);  // Start buzzer tone
    delay(100); // Short beep delay
    noTone(pinBuzzer);   // Stop buzzer tone
    delay(500);  // Longer pause
  }
    digitalWrite(pinGreen, LOW);  // Turn green off
}

void setup() {
  pinMode(pinButton, INPUT_PULLUP); // Button as input
  pinMode(pinBuzzer, OUTPUT);  // Buzzer as output
  pinMode(pinRed, OUTPUT);  // Red as output
  pinMode(pinYellow, OUTPUT);  // Yellow as output
  pinMode(pinGreen, OUTPUT);  // Green as output
}

void loop() {
  red();  // Run red phase
  green();  // Run green phase
  yellow();  // Run yellow phase
}
How it works:
This project works as a simple Arduino traffic light. The three LEDs represent the red, yellow, and green lights, while the buzzer adds sound signals during some phases of the cycle.
The lines #define pinButton 2, #define pinBuzzer 3, #define pinRed 8, #define pinYellow 9, and #define pinGreen 10 assign the Arduino pins used by the button, buzzer, and LEDs.
The variables redDuration = 10000, yellowDuration = 2000, and greenDuration = 5000 define how long each light stays active. These values are expressed in milliseconds, so 10000 means 10 seconds, 2000 means 2 seconds, and 5000 means 5 seconds.
Inside setup(), the line pinMode(pinButton, INPUT_PULLUP); configures the button with the internal pull-up resistor. This means the button normally reads HIGH, and when it is pressed it reads LOW.
The lines pinMode(pinBuzzer, OUTPUT);, pinMode(pinRed, OUTPUT);, pinMode(pinYellow, OUTPUT);, and pinMode(pinGreen, OUTPUT); configure the buzzer and LEDs as outputs, so the Arduino can turn them on and off.
The main cycle is inside loop(). The Arduino executes red();, then green();, and finally yellow();. After yellow finishes, the loop starts again from red.
The function red() controls the red light phase. The line unsigned long start = millis(); saves the exact time when the red phase begins. The function millis() returns the number of milliseconds passed since the Arduino was powered on or reset.
The condition while(millis() < start + redDuration) keeps the red phase active until the selected time has passed. During this time, digitalWrite(pinRed, HIGH); keeps the red LED turned on.
The button is checked with digitalRead(pinButton) == LOW. Since the button uses INPUT_PULLUP, LOW means that the button is pressed.
The condition if(digitalRead(pinButton) == LOW && !buttonPressed && millis() < start + redDuration - 2000) allows the button action only once during the red phase and only if at least 2 seconds remain.
The line start -= 2000; changes the timing of the red phase. In this exact code, subtracting 2000 from start makes start + redDuration become earlier, so the red phase is shortened by about 2 seconds. The variable buttonPressed = true; prevents the same button press from being applied repeatedly during the same red cycle.
At the end of the red phase, digitalWrite(pinRed, LOW); turns the red LED off.
The function green() controls the green phase. It saves the start time with millis() and keeps the green LED active while millis() < start + greenDuration is true.
During the green phase, the line tone(pinBuzzer, 1000); turns the buzzer on at 1000 Hz for 100 milliseconds. Then noTone(pinBuzzer); turns it off, followed by a longer pause of 500 milliseconds. This creates a slow beep pattern.
The function yellow() works in a similar way, but it controls the yellow LED and uses a shorter pause between beeps. The buzzer stays on for 100 milliseconds and then pauses for 200 milliseconds, creating a faster warning rhythm.
The functions red(), green(), and yellow() are blocking phases: while one function is running, the program stays inside that phase until its time has finished. This is simple and effective for a basic traffic light simulation.
Overall, the circuit repeats a red-green-yellow sequence. The red phase is silent, the green phase produces slower beeps, and the yellow phase produces faster beeps. The push button is read during the red phase and, in this version of the code, can shorten that phase by about 2 seconds.