How to Use the DFPlayer Mini with Arduino
The official DFRobot product name is DFPlayer - Mini MP3 Player, with SKU DFR0299. It is a small audio module that can play MP3, WAV and WMA files from a microSD/TF card and, in the reference design, from USB storage. It can be controlled by Arduino through UART, but it also supports standalone push-button and resistor-key modes.
The module in the supplied photograph is marked MP3-TF-16P V3.0, a common compatible form factor. Because several revisions and compatible modules exist, some advanced commands may behave differently. This guide uses DFRobot's official interface and library as its reference.
How the DFPlayer Mini works
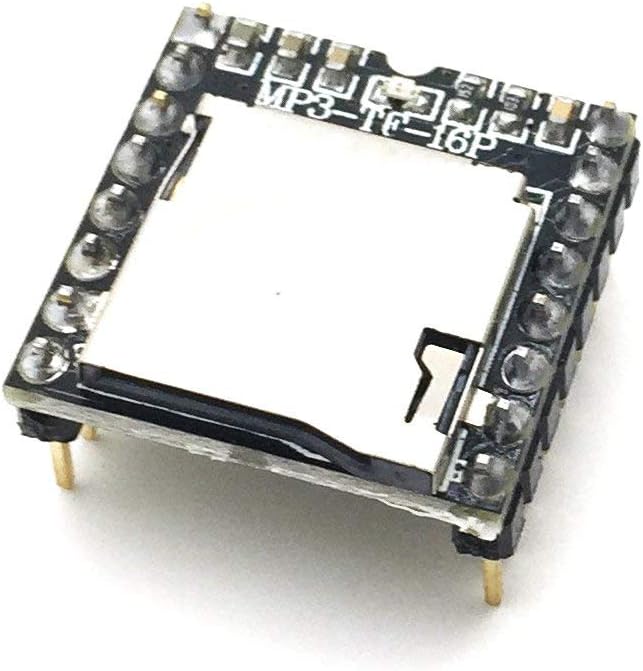
The DFPlayer Mini contains an audio decoder, microSD reader, digital-to-analog converter, small mono amplifier and serial interface. Arduino does not decode the audio file: it only sends commands such as “play track 1”, “increase volume” or “pause”.
The default UART connection normally uses 9600 bit/s, 8 data bits, no parity and one stop bit. Volume can be set to one of 30 levels, from 0 to 30.
Complete DFPlayer Mini pinout
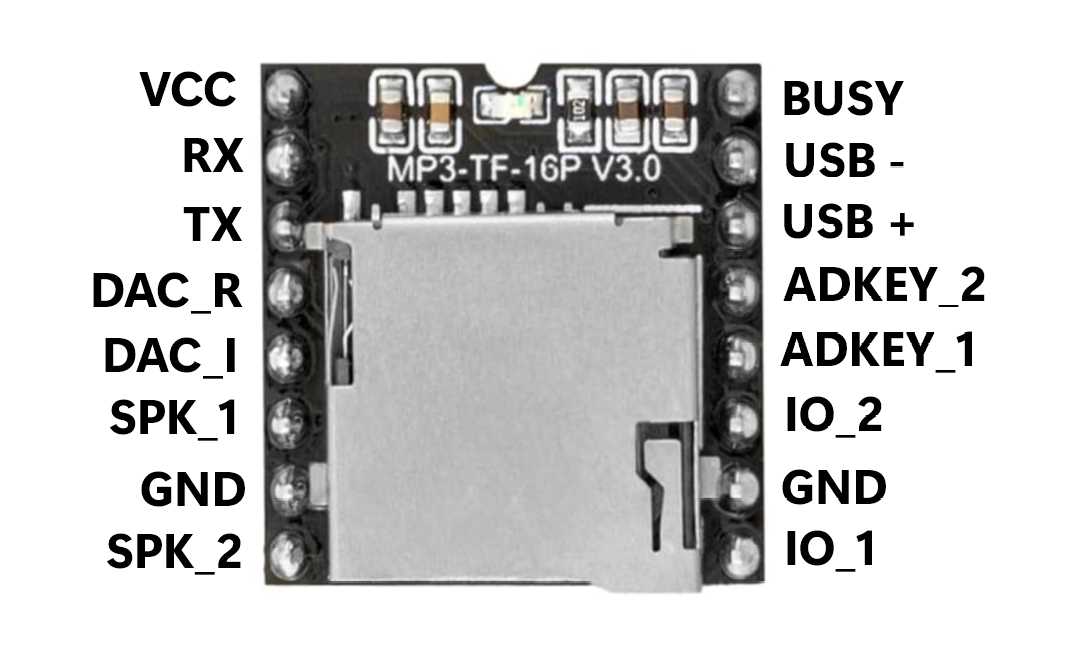
VCC and GND: power
VCC powers the module, while both GND pins are connected to the common ground. The reference design accepts approximately 3.2-5 V; with Arduino UNO, a stable 5 V supply is normally used. The two GND pins may be used at different points in the circuit, but they share the same electrical ground.
RX and TX: serial communication with Arduino
RX is the DFPlayer serial input and receives commands from Arduino. TX is the module serial output and sends replies, states and errors to Arduino. The signals are crossed: DFPlayer TX connects to the selected Arduino RX pin, while Arduino TX connects toward DFPlayer RX.
SPK_1 and SPK_2: direct speaker output
SPK_1 and SPK_2 are the two terminals of the built-in bridge mono amplifier. Connect a small speaker directly between SPK_1 and SPK_2. Neither speaker terminal should be connected to GND. The integrated amplifier is intended for a small speaker rated at approximately 3 W or less.
DAC_L and DAC_R: stereo audio output
DAC_L and DAC_R provide the left and right unamplified audio channels. They are intended for an external amplifier, an audio input or, within the manufacturer's limits, headphones. They should not be used in place of SPK_1 and SPK_2 to directly drive a power speaker.
USB+ and USB-: U-disk storage
USB+ and USB- are the D+ and D- data lines for USB storage. A USB female connector or breakout must be wired correctly, and the flash drive also needs 5 V and GND. These pins are not a USB serial programming port and do not directly upload files or firmware from a computer.
IO_1 and IO_2: simple two-button control
IO_1 and IO_2 can control the module without Arduino. Connect each pin to a push button that closes to GND. A short press selects the previous or next track, while a long press adjusts the volume. In the reference behavior, IO_1 handles previous/volume down and IO_2 handles next/volume up.
ADKEY_1 and ADKEY_2: many buttons through two inputs
ADKEY_1 and ADKEY_2 measure different voltage levels. Buttons connected to GND through different resistor values allow the module to identify which command was selected. The reference design can distribute up to 20 commands across the two inputs. The resistor values must follow the module's ADKEY table; these are not ordinary digital-button inputs.
BUSY: playback status
The BUSY pin indicates playback state. In the reference behavior it is LOW while a file is playing and HIGH while the module is idle. It can be connected to an Arduino digital input so the sketch can detect the real end of a spoken message instead of relying on a fixed delay.
Wire the DFPlayer Mini to Arduino UNO
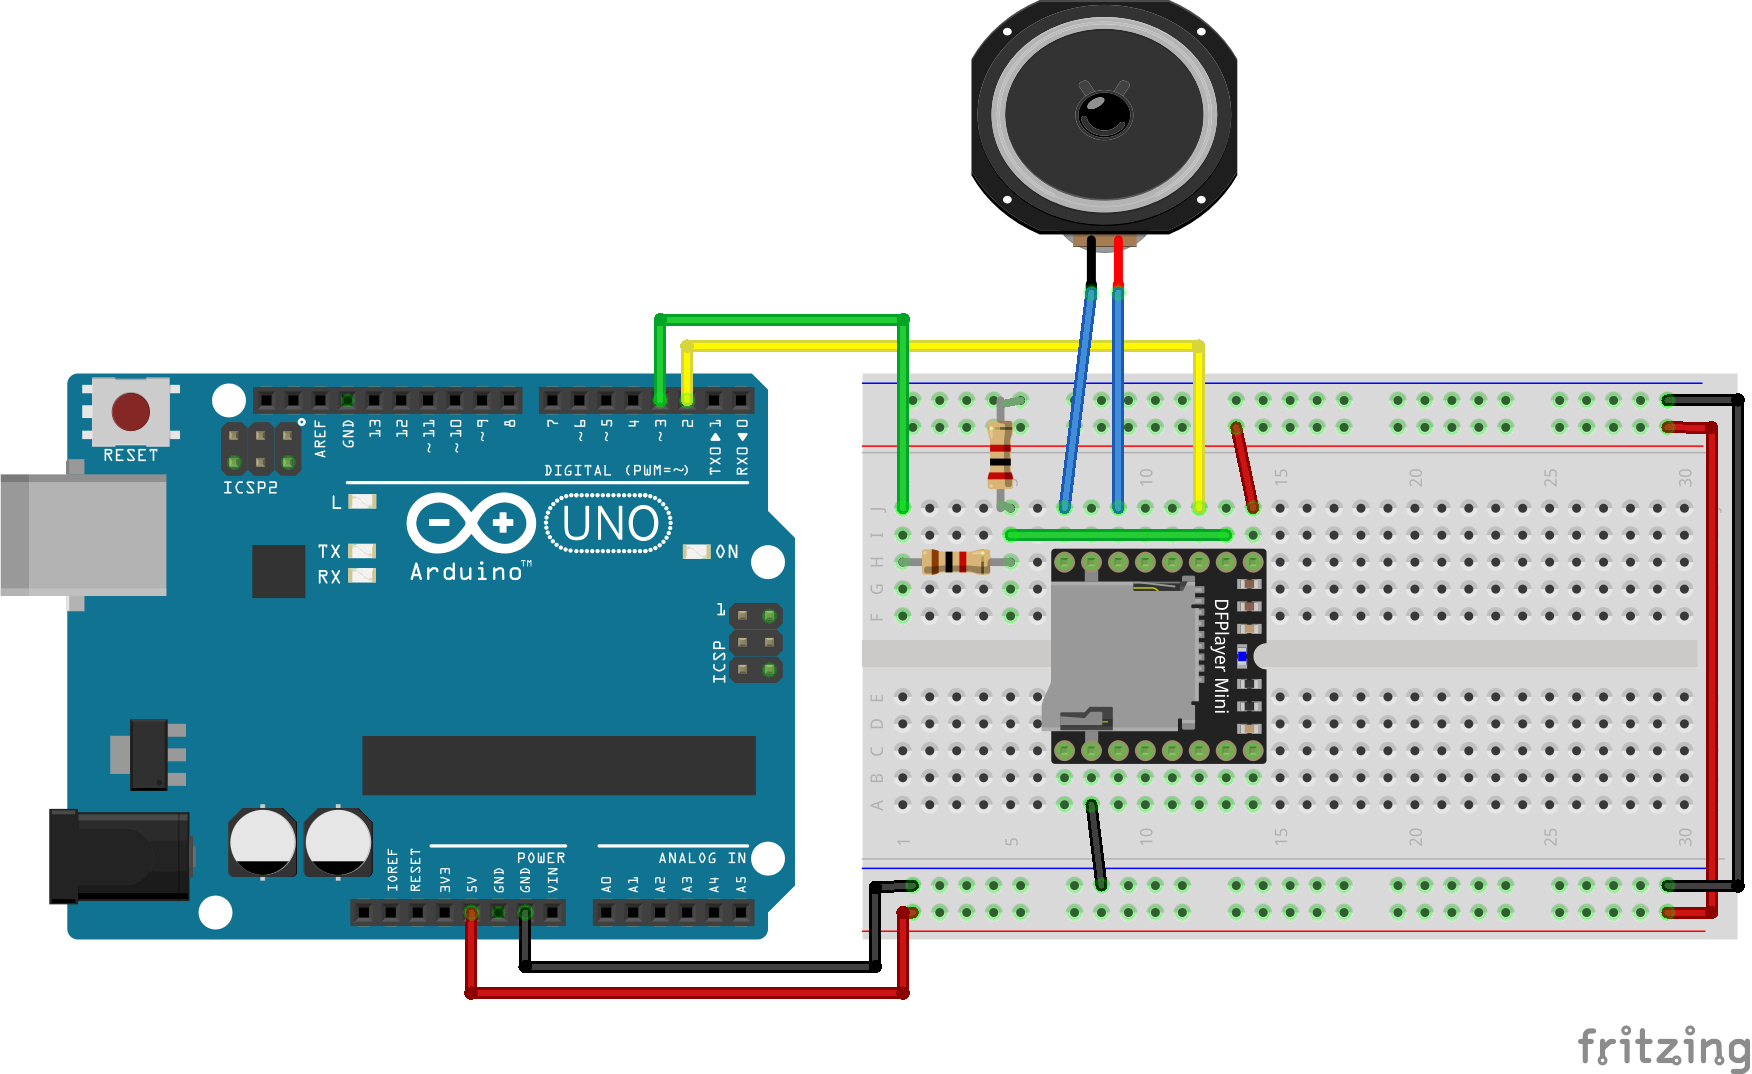
- DFPlayer VCC → Arduino 5V;
- DFPlayer GND → Arduino GND;
- DFPlayer TX → Arduino pin 2, used as software RX;
- Arduino pin 3, used as software TX → 1 kΩ resistor → DFPlayer RX node;
- 2 kΩ resistor from the DFPlayer RX node to GND;
- speaker connected between SPK_1 and SPK_2.
Why use a 1 kΩ and 2 kΩ voltage divider?
Arduino UNO normally transmits a logic-high level close to 5 V, while the module serial input uses a lower level. The 1 kΩ and 2 kΩ resistors form a divider:
VOUT = 5 V × 2 kΩ / (1 kΩ + 2 kΩ) ≈ 3.33 V
The 1 kΩ resistor is placed between Arduino TX and the DFPlayer RX node. The 2 kΩ resistor connects that node to GND. DFPlayer TX can connect directly to Arduino RX because its high level can be read by the ATmega328P.
Prepare the microSD card and audio files
Use a microSD/TF card up to 32 GB formatted as FAT16 or FAT32. For predictable selection with playMp3Folder(), create an mp3 folder in the root directory and use four-digit file names:
/mp3/0001.mp3
/mp3/0002.mp3
/mp3/0003.mp3
Text may follow the number, for example 0001_startup.mp3. Do not insert or remove the card while the module is powered. The generic play(1) command can depend on file copy order, so numeric names and folder-specific functions are often more reliable.
Install the DFRobotDFPlayerMini library
Open the Arduino IDE Library Manager, search for DFRobotDFPlayerMini and install the library maintained by DFRobot. This guide also uses SoftwareSerial, which is included in the Arduino AVR environment.
#include <SoftwareSerial.h>
#include <DFRobotDFPlayerMini.h>
First sketch: play /mp3/0001.mp3
// https://nemiatools.com
#include <SoftwareSerial.h>
#include <DFRobotDFPlayerMini.h>

// Arduino pin 2 = RX: receives from DFPlayer TX
// Arduino pin 3 = TX: sends to DFPlayer RX
SoftwareSerial dfSerial(2, 3);

DFRobotDFPlayerMini dfPlayer;

void setup() {
  Serial.begin(9600);
  dfSerial.begin(9600);

  Serial.println("Initializing DFPlayer Mini...");

  if (!dfPlayer.begin(dfSerial, true, true)) {
    Serial.println("DFPlayer not detected.");
    Serial.println("Check wiring and storage.");
    while (true) {
      delay(1000);
    }
  }

  Serial.println("DFPlayer ready");

  dfPlayer.volume(20); // Volume from 0 to 30
  dfPlayer.EQ(DFPLAYER_EQ_NORMAL);
  dfPlayer.outputDevice(DFPLAYER_DEVICE_SD);

  delay(500);
  dfPlayer.playMp3Folder(1); // /mp3/0001.mp3
}

void loop() {
  if (dfPlayer.available()) {
    uint8_t eventType = dfPlayer.readType();
    int eventValue = dfPlayer.read();

    Serial.print("DFPlayer event: ");
    Serial.print(eventType);
    Serial.print(" - value: ");
    Serial.println(eventValue);
  }
}
How the code works
SoftwareSerial dfSerial(2, 3) creates a software serial port. The first number is RX and the second is TX: Arduino receives on pin 2 from the module TX pin and sends from pin 3 through the divider to the module RX pin.
dfPlayer.begin(dfSerial, true, true) attaches the library to the selected serial port. The second argument enables ACK replies and the third requests a module reset during initialization. If it returns false, the sketch stops because the player was not initialized.
volume(20) sets the volume, EQ(DFPLAYER_EQ_NORMAL) selects normal equalization and outputDevice(DFPLAYER_DEVICE_SD) selects the microSD card. After a short delay, playMp3Folder(1) plays /mp3/0001.mp3.
Inside the loop, available() reports an event or reply. readType() returns the event type and read() its associated value, which is useful for detecting track completion, removed storage and errors.
Example: control the DFPlayer from Serial Monitor
// https://nemiatools.com
#include <SoftwareSerial.h>
#include <DFRobotDFPlayerMini.h>

SoftwareSerial dfSerial(2, 3);
DFRobotDFPlayerMini dfPlayer;

int volumeLevel = 20;

void printCommands() {
  Serial.println();
  Serial.println("Commands:");
  Serial.println("1 = play /mp3/0001.mp3");
  Serial.println("2 = play /mp3/0002.mp3");
  Serial.println("n = next track");
  Serial.println("p = previous track");
  Serial.println("+ = volume up");
  Serial.println("- = volume down");
  Serial.println("a = pause");
  Serial.println("r = resume");
  Serial.println("s = stop");
}

void setup() {
  Serial.begin(9600);
  dfSerial.begin(9600);

  if (!dfPlayer.begin(dfSerial, true, true)) {
    Serial.println("Initialization error");
    while (true) {
      delay(1000);
    }
  }

  dfPlayer.volume(volumeLevel);
  dfPlayer.outputDevice(DFPLAYER_DEVICE_SD);

  printCommands();
}

void loop() {
  if (Serial.available()) {
    char command = Serial.read();

    switch (command) {
      case '1':
        dfPlayer.playMp3Folder(1);
        break;

      case '2':
        dfPlayer.playMp3Folder(2);
        break;

      case 'n':
        dfPlayer.next();
        break;

      case 'p':
        dfPlayer.previous();
        break;

      case '+':
        if (volumeLevel < 30) {
          volumeLevel++;
          dfPlayer.volume(volumeLevel);
        }
        break;

      case '-':
        if (volumeLevel > 0) {
          volumeLevel--;
          dfPlayer.volume(volumeLevel);
        }
        break;

      case 'a':
        dfPlayer.pause();
        break;

      case 'r':
        dfPlayer.start();
        break;

      case 's':
        dfPlayer.stop();
        break;
    }
  }
}
This sketch demonstrates how a sensor, keypad or button can control the player. The Serial Monitor is only the source of the commands; the DFPlayer itself performs the audio decoding and playback.
Main functions provided by the library
Initialization, waiting and messages
begin(stream, isACK, doReset) initializes the module on a selected stream. setTimeOut(ms) sets the reply timeout. available() checks for an event, while waitAvailable(duration) can wait for one. readType() and read() return the message type and value.
Basic playback
play(number) starts a track by index on the selected device. next() and previous() change track. pause() pauses, start() resumes and stop() stops playback. loop(number) repeatedly plays one selected track.
Folders and numeric file names
playMp3Folder(number) selects a file such as /mp3/0001.mp3. playFolder(folder, file) uses numeric folders and three-digit names, for example /15/004.mp3. playLargeFolder(folder, file) supports larger numeric ranges according to firmware. loopFolder(folder) repeats every file in a folder.
Looping and random playback
enableLoop() and disableLoop() control repetition of the current track. enableLoopAll() and disableLoopAll() control full-library looping. randomAll() starts random playback.
Volume and equalizer
volume(value) sets a level from 0 to 30. volumeUp() and volumeDown() change it one step. EQ() selects NORMAL, POP, ROCK, JAZZ, CLASSIC or BASS.
Storage selection
outputDevice() selects the source. Library constants include DFPLAYER_DEVICE_SD, DFPLAYER_DEVICE_U_DISK, FLASH, AUX and SLEEP. Not every source is physically available or equally reliable on every compatible module.
Advertisement tracks
advertise(number) temporarily interrupts the current track to play a file from /ADVERT. Previous playback can continue afterward. stopAdvertise() ends the announcement. This is useful for voice prompts and notifications.
Module and output control
sleep() enters sleep mode and reset() restarts the module. enableDAC() and disableDAC() control the DAC. outputSetting(enable, gain) enables the output and sets the protocol-defined gain.
Reading information
readState() reads playback state, readVolume() reads volume and readEQ() reads the EQ profile. readFileCounts() returns file count, and its parameterized form can select a device. readCurrentFileNumber() returns the current file. readFileCountsInFolder(folder) counts files in a folder and readFolderCounts() reads folder count.
Play audio from a USB flash drive
The DFPlayer reference design supports a USB “U-disk” up to 32 GB. Connect USB+ and USB- to D+ and D- on a USB-A female connector, and supply the flash drive with 5 V and GND. Keep the USB wiring short and correctly paired.
// Select the USB flash drive as storage
dfPlayer.outputDevice(DFPLAYER_DEVICE_U_DISK);

delay(500);

// Play the first available track
dfPlayer.play(1);
Insert the flash drive before initialization and allow the module time to detect it. Compatible modules and unofficial revisions may not implement U-disk mode in exactly the same way, so check the specific board documentation if it fails.
Use the DFPlayer Mini without Arduino
Two-button I/O mode
Connect one push button from IO_1 to GND and another from IO_2 to GND. Short presses change track, while long presses adjust volume. Only power, a speaker and storage are required.
ADKEY mode with many buttons
To build a larger control panel, connect buttons to ADKEY_1 and ADKEY_2 through the specified resistor values to GND. The module measures the resulting voltage and maps each range to a different function, including direct track selection, play/pause, playback mode and volume. This mode needs no microcontroller, but it does require the correct resistor table and reasonable resistor tolerances.
Use the BUSY pin with Arduino
const byte BUSY_PIN = 4;

void setup() {
  pinMode(BUSY_PIN, INPUT);
}

void loop() {
  if (digitalRead(BUSY_PIN) == LOW) {
    // DFPlayer is playing
  }
  else {
    // Playback ended or the module is idle
  }
}
BUSY is useful when an action must wait for a spoken message to finish. Some compatible modules may invert or otherwise alter this signal, so verify it on the actual board during testing.
DFPlayer Mini applications
- talking robots and animatronics;
- voice prompts for sensors and alarms;
- doorbells and greeting systems;
- toys, cosplay and interactive props;
- RFID- or keypad-controlled audio players;
- sound effects for models and dioramas;
- spoken menus and accessible devices.
Common problems
The module does not initialize
Check VCC, GND, crossed RX/TX wiring, 9600-baud serial and valid storage. Make sure Arduino TX reaches module RX through the divider.
There is buzzing or serial communication is unstable
Use a stable supply, short wiring and a common ground. The RX divider provides the correct logic level; keep serial wires away from speaker wiring.
The requested file does not play
Check FAT16/FAT32 formatting, the folder name and the four-digit file number. Also verify that the requested number exists and that hidden operating-system files have not affected ordering.
Audio is distorted or the module restarts
Lower the volume and make sure the power supply can provide the amplifier current. Do not connect a speaker between SPK_1 and GND; it must be connected between SPK_1 and SPK_2.
The USB flash drive is not detected
Check the flash-drive 5 V supply, USB+ and USB- order, FAT formatting and actual compatibility of the board revision. USB mode is not a direct computer connection.