Remote-Controlled Servomotor
Description
This project is an infrared remote-controlled servo motor system built around an Arduino board, an IR receiver, and a standard servo. The circuit continuously listens for commands from a remote control and, when the “Up” or “Down” buttons are pressed, it increases or decreases the servo angle in fixed steps. With its simple structure and small number of components, it is an excellent project for learning the basics of infrared communication, servo control, and embedded programming. It can be used as a foundation for home automation prototypes, remote-positioning systems, robotic mechanisms, or other interactive electronic applications.
Required components:
- 1x Arduino UNO
- 1x 5V Servomotor
- 1x 5v IR Receiver
- 1x Suitable Remote
- Jumper Cables (and optional breadboard)
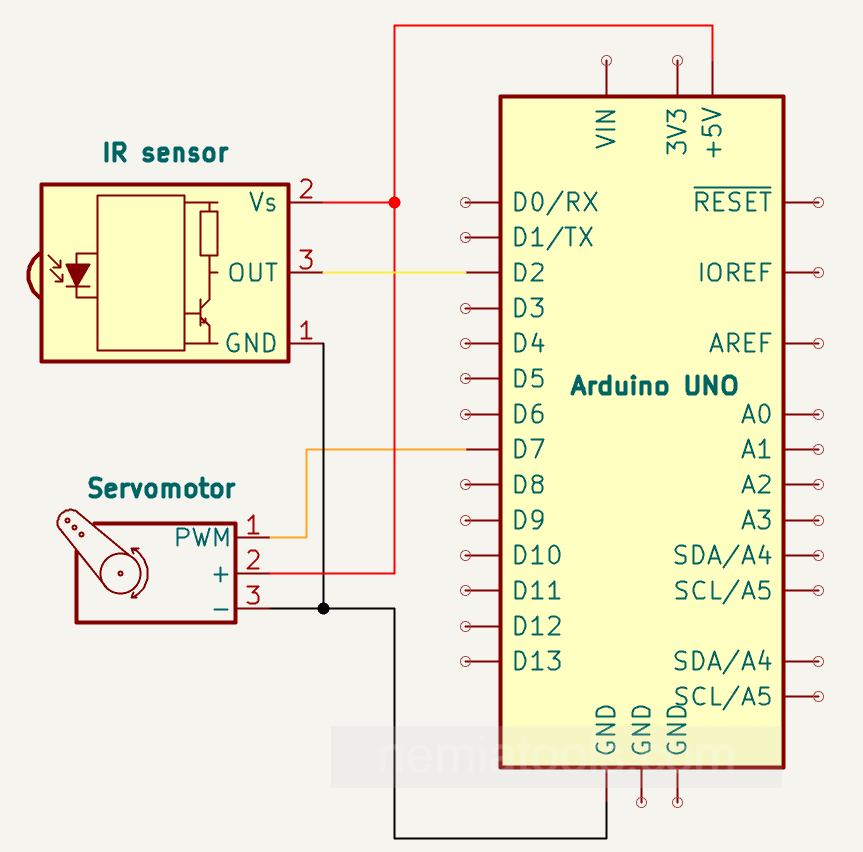
Schematic:
CODE:
// https://nemiatools.com
#include <IRremote.hpp> // IR library
#include <Servo.h>      // Servo library

#define IRpin 2     // IR receiver pin
#define Servopin 7  // Servo pin

int angle = 90;  // Initial angle
int step = 30;   // Angle step

uint8_t command = 0; // Received command
Servo myservo;       // Servo object

void setup()
{
  Serial.begin(9600);       // Start serial
  IrReceiver.begin(IRpin);  // Start IR receiver
  myservo.attach(Servopin); // Attach servo
}

void loop()
{
  if(IrReceiver.decode()){                      // If a signal arrives
    command = IrReceiver.decodedIRData.command; // Read command
    Serial.println(command);                    // Print command
    IrReceiver.resume();                        // Ready for next one
  }

  if(command == 8){                     // “Down” button
    angle -= step;                      // Decrease angle
    angle = constrain(angle, 0, 180);   // Keep in range
    myservo.write(angle);               // Move servo
    command = 0;                        // Clear command
  }

  if(command == 10){                    // “Up” button
    angle += step;                      // Increase angle
    angle = constrain(angle, 0, 180);   // Keep in range
    myservo.write(angle);               // Move servo
    command = 0;                        // Clear command
  }

  delay(10);  // Small delay
}
How it works:
This project uses an IR remote control to move a servo motor to different positions. The IR receiver is connected to pin 2 of the Arduino, while the servo signal wire is connected to pin 7. These pins are defined in the code with #define IRpin 2 and #define Servopin 7.
The program uses the IRremote library, included with #include <IRremote.hpp>, to receive and decode infrared signals from the remote control. It also uses the Servo library, included with #include <Servo.h>, to control the position of the servo motor. At the beginning of the code, the servo angle is set to 90 degrees with int angle = 90;, placing it approximately in the center of its movement range. The variable int step = 30; defines how many degrees the servo will move each time a valid button is pressed.
In the setup section, the Arduino starts serial communication with Serial.begin(9600);, so the received IR command values can be displayed on the Serial Monitor. The IR receiver is activated with IrReceiver.begin(IRpin);, and the servo is connected to its control pin using myservo.attach(Servopin);. This prepares the Arduino to receive commands from the remote and send position signals to the servo motor.
During the loop, the Arduino continuously checks if an infrared signal has been received using if(IrReceiver.decode()). When a signal arrives, the decoded command is stored with command = IrReceiver.decodedIRData.command; and printed on the Serial Monitor. After this, IrReceiver.resume(); prepares the receiver to read the next incoming signal.
If the received command is command == 8, which corresponds to the “Down” button, the servo angle is decreased using angle -= step;. If the received command is command == 10, which corresponds to the “Up” button, the servo angle is increased using angle += step;. In both cases, the servo moves by 30 degrees from its current position.
After the angle is changed, the instruction angle = constrain(angle, 0, 180); keeps the value inside the safe servo range, from 0 to 180 degrees. This prevents the servo from trying to move beyond its mechanical limits. The new position is then sent to the servo with myservo.write(angle);, making the motor rotate to the selected angle.
After each movement, the command is cleared with command = 0;. This prevents the same command from being repeated continuously without pressing the button again. Finally, delay(10); adds a small delay that helps keep the program stable.
The command values 8 and 10 depend on the specific IR remote being used, so with a different remote these values may change. For reliable operation, especially with larger servos, it is recommended to power the servo with an external 5V supply and connect the external power supply ground to the Arduino ground.