Avoiding obstacles robot
Description
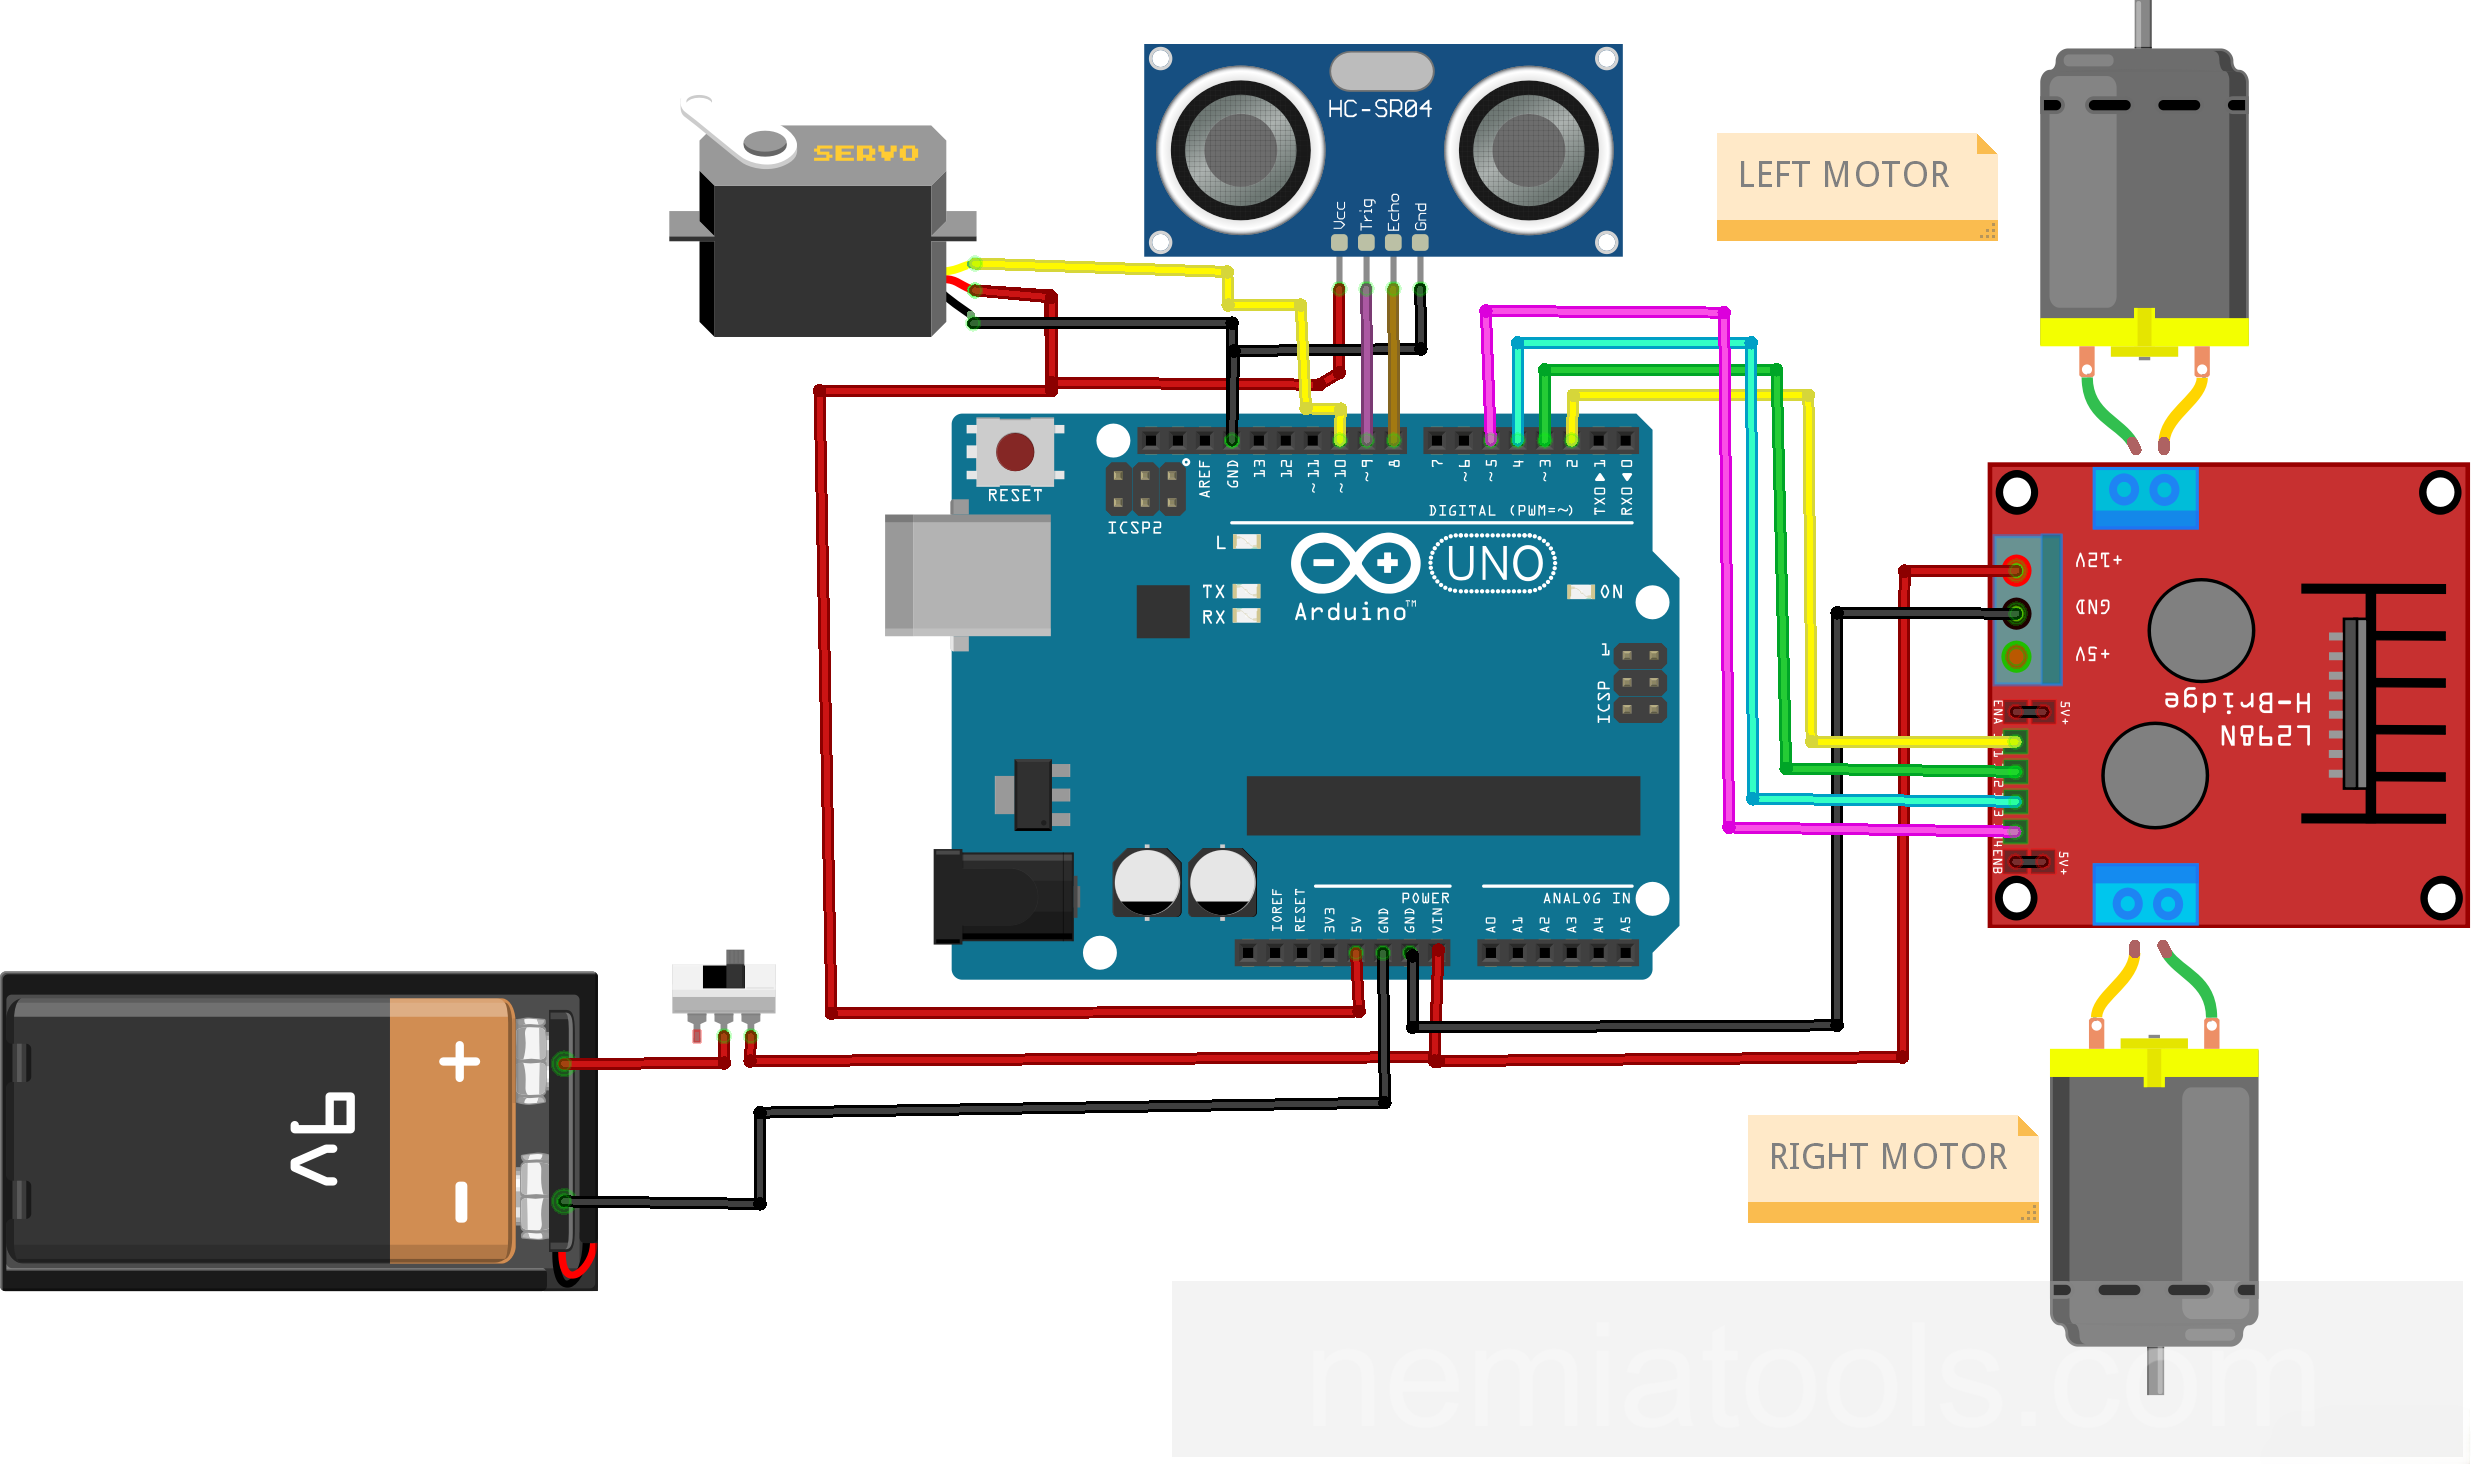
This project is an autonomous obstacle-avoiding robot built with an Arduino, two DC motors, an ultrasonic distance sensor, and a servo motor. The ultrasonic sensor is mounted on the servo so it can inspect the front, right, and left sides of the robot. While the path is clear, the robot moves forward automatically. When it detects an obstacle within 20 cm, it stops, reverses, scans both sides, and turns toward the direction with more available space. This project is useful for learning ultrasonic distance measurement, servo-controlled scanning, motor direction control, decision-making algorithms, and autonomous robotic navigation.
Required components:
- 1x Arduino UNO
- 1x HC-SR04 ultrasonic sensor
- 1x 5V Servomotor
- 1x L298N motor driver
- 2x 5/12V Gear motor
- Jumper Cables (and optional breadboard)
Schematic:
CODE:
// https://nemiatools.com
#include <NewPing.h> // Include NewPing library
#include <Servo.h> // Include Servo library

// Motor pins
const int leftMotorForwardPin = 2; // Left motor forward pin
const int leftMotorBackwardPin = 3; // Left motor backward pin
const int rightMotorForwardPin = 4; // Right motor forward pin
const int rightMotorBackwardPin = 5; // Right motor backward pin

// Sensor and servo pins
#define ultrasonicTrigPin 9 // Ultrasonic trigger pin
#define ultrasonicEchoPin 8 // Ultrasonic echo pin
#define scannerServoPin 10 // Scanner servo pin

#define maxSensorDistance 200 // Maximum sensor distance

bool movingForward = false; // Tracks forward movement
int frontDistance = 100; // Stores front distance

NewPing ultrasonicSensor(ultrasonicTrigPin, ultrasonicEchoPin, maxSensorDistance); // Create ultrasonic sensor
Servo scannerServo; // Create servo object

void setup() {
  pinMode(rightMotorForwardPin, OUTPUT); // Set pin as output
  pinMode(leftMotorForwardPin, OUTPUT); // Set pin as output
  pinMode(leftMotorBackwardPin, OUTPUT); // Set pin as output
  pinMode(rightMotorBackwardPin, OUTPUT); // Set pin as output

  scannerServo.attach(scannerServoPin); // Attach servo pin

  scannerServo.write(115); // Center the servo
  delay(2000); // Wait two seconds

  frontDistance = readDistance(); // Read front distance
  delay(100); // Wait briefly
  frontDistance = readDistance(); // Read front distance
  delay(100); // Wait briefly
  frontDistance = readDistance(); // Read front distance
  delay(100); // Wait briefly
  frontDistance = readDistance(); // Read front distance
  delay(100); // Wait briefly
} // Setup function ends

int scanRight() { // Scan right side
  scannerServo.write(50); // Turn servo right
  delay(500); // Wait for movement

  int rightDistance = readDistance(); // Store right distance

  delay(100); // Wait briefly
  scannerServo.write(115); // Center the servo

  return rightDistance; // Return right distance
}

int scanLeft() { // Scan left side
  scannerServo.write(170); // Turn servo left
  delay(500); // Wait for movement

  int leftDistance = readDistance(); // Store left distance

  delay(100); // Wait briefly
  scannerServo.write(115); // Center the servo

  return leftDistance; // Return left distance
}

int readDistance() { // Read sensor distance
  delay(70); // Stabilize sensor reading

  int distanceInCm = ultrasonicSensor.ping_cm(); // Measure distance centimeters

  if (distanceInCm == 0) { // Check invalid reading
    distanceInCm = 250; // Set fallback distance
  }

  return distanceInCm; // Return measured distance
}

void stopMotors() { // Stop all motors
  digitalWrite(rightMotorForwardPin, LOW); // Stop right forward
  digitalWrite(leftMotorForwardPin, LOW); // Stop left forward
  digitalWrite(rightMotorBackwardPin, LOW); // Stop right backward
  digitalWrite(leftMotorBackwardPin, LOW); // Stop left backward
}

void driveForward() { // Drive robot forward
  if (!movingForward) { // Check not moving forward
    movingForward = true; // Mark moving forward

    digitalWrite(leftMotorForwardPin, HIGH); // Enable left forward
    digitalWrite(rightMotorForwardPin, HIGH); // Enable right forward

    digitalWrite(leftMotorBackwardPin, LOW); // Disable left backward
    digitalWrite(rightMotorBackwardPin, LOW); // Disable right backward
  }
}

void driveBackward() { // Drive robot backward
  movingForward = false; // Clear forward state

  digitalWrite(leftMotorBackwardPin, HIGH); // Enable left backward
  digitalWrite(rightMotorBackwardPin, HIGH); // Enable right backward

  digitalWrite(leftMotorForwardPin, LOW); // Disable left forward
  digitalWrite(rightMotorForwardPin, LOW); // Disable right forward
}

void turnRobotRight() { // Turn robot right
  digitalWrite(leftMotorForwardPin, HIGH); // Enable left forward
  digitalWrite(rightMotorBackwardPin, HIGH); // Enable right backward

  digitalWrite(leftMotorBackwardPin, LOW); // Disable left backward
  digitalWrite(rightMotorForwardPin, LOW); // Disable right forward

  delay(500); // Turn for duration

  stopMotors(); // Stop after turning
}

void turnRobotLeft() { // Turn robot left
  digitalWrite(leftMotorBackwardPin, HIGH); // Enable left backward
  digitalWrite(rightMotorForwardPin, HIGH); // Enable right forward

  digitalWrite(leftMotorForwardPin, LOW); // Disable left forward
  digitalWrite(rightMotorBackwardPin, LOW); // Disable right backward

  delay(500); // Turn for duration

  stopMotors(); // Stop after turning
}

void loop() {
  int rightScanDistance = 0; // Initialize right distance
  int leftScanDistance = 0; // Initialize left distance

  delay(50); // Wait briefly

  if (frontDistance <= 20) { // Detect nearby obstacle
    stopMotors(); // Stop the robot
    delay(300); // Wait briefly

    driveBackward(); // Move backward
    delay(400); // Reverse for duration

    stopMotors(); // Stop the robot
    delay(300); // Wait briefly

    rightScanDistance = scanRight(); // Scan right distance
    delay(300); // Wait briefly

    leftScanDistance = scanLeft(); // Scan left distance
    delay(300); // Wait briefly

    if (rightScanDistance >= leftScanDistance) { // Compare side distances
      turnRobotRight(); // Turn right
    } else { // Otherwise turn left
      turnRobotLeft(); // Turn left
    }

    stopMotors(); // Stop the robot
  } else { // Path is clear
    driveForward(); // Move forward
  }

  frontDistance = readDistance(); // Update front distance
}
How it works:
This project controls an autonomous robot that moves forward and changes direction whenever it detects an obstacle. The ultrasonic sensor measures the free space ahead, while the servo rotates the sensor to compare the right and left sides before the robot chooses where to turn.
The line #include <NewPing.h> adds the NewPing library. This library simplifies the use of ultrasonic sensors by automatically generating the trigger pulse, measuring the returning echo, and converting the result into distance.
The line #include <Servo.h> adds the Arduino Servo library. It generates the control pulses required to position the servo motor at a selected angle.
The four motor pins control the two DC motors through a motor driver or H-bridge. The lines leftMotorForwardPin and leftMotorBackwardPin control the direction of the left motor, while rightMotorForwardPin and rightMotorBackwardPin control the right motor.
Each motor has one input for forward rotation and one for backward rotation. Setting the forward input HIGH and the backward input LOW makes that motor rotate forward. Reversing these states changes its direction. Setting both inputs LOW stops the motor.
The motors must not be connected directly to the Arduino pins because they require more current than the microcontroller can provide. These pins are intended to control a suitable motor driver such as an L293D, L298N, TB6612FNG, or another H-bridge module.
The ultrasonic sensor uses pin 9 as its trigger connection and pin 8 as its echo connection. The servo that rotates the sensor is connected to pin 10.
The line #define maxSensorDistance 200 sets the maximum ultrasonic measuring distance to 200 cm. Limiting the range reduces the time spent waiting for echoes from very distant objects.
The object NewPing ultrasonicSensor(ultrasonicTrigPin, ultrasonicEchoPin, maxSensorDistance); associates the ultrasonic sensor with its pins and maximum range. The object Servo scannerServo; represents the servo motor used by the scanner.
The variable frontDistance stores the most recent distance measured in front of the robot. The variable movingForward records whether the forward command has already been applied, avoiding unnecessary repetition of the same motor command.
Inside setup(), the four motor-control pins are configured as outputs. The line scannerServo.attach(scannerServoPin); connects the Servo object to pin 10.
The line scannerServo.write(115); places the ultrasonic sensor in its central position. The center is set to 115 degrees rather than exactly 90 because the correct angle can depend on the mechanical installation of the servo and sensor bracket.
The program waits two seconds to let the servo reach its position. It then performs four front measurements. These initial readings help the ultrasonic sensor and the mechanical scanner settle before normal navigation begins.
The function readDistance() performs one ultrasonic measurement. The initial delay(70); leaves enough time for previous ultrasonic echoes to disappear, reducing unstable or overlapping measurements.
The line int distanceInCm = ultrasonicSensor.ping_cm(); sends an ultrasonic pulse and returns the measured distance in centimeters. The sensor emits a high-frequency sound wave and waits for its reflection from an object. The library calculates the distance from the round-trip travel time of that sound wave.
If no valid echo is received within the configured range, ping_cm() returns zero. The condition if (distanceInCm == 0) replaces this value with 250, so a missing echo is treated as an object farther away than the 200 cm measuring limit.
The function scanRight() rotates the sensor to 50 degrees, waits 500 milliseconds for the servo to reach the position, and measures the available space on the right. It then commands the servo to return to its central position.
The function scanLeft() performs the same process at 170 degrees to measure the free space on the left. The exact angles can be adjusted according to the orientation and mechanical limits of the servo.
The function stopMotors() sets all four motor-control signals LOW. This removes every forward and backward command and stops both motors.
The function driveForward() activates the forward input of both motors and disables both backward inputs. Because the two wheels rotate forward together, the robot travels in a straight line.
The condition if (!movingForward) applies these signals only when the robot was not already moving forward. The variable is then set to true to record the new movement state.
The function driveBackward() activates the backward input of both motors and disables their forward inputs. Both wheels reverse together, moving the robot away from the detected obstacle.
The function turnRobotRight() drives the left motor forward and the right motor backward. Since the wheels rotate in opposite directions, the robot turns approximately around its own center instead of following a wide curve.
The function turnRobotLeft() performs the opposite action: the left wheel moves backward while the right wheel moves forward. Each turn lasts 500 milliseconds, after which the motors are stopped.
Inside loop(), the program first checks the latest value stored in frontDistance. The condition if (frontDistance <= 20) means that an obstacle 20 cm away or closer is considered unsafe.
When an obstacle is detected, the robot stops for 300 milliseconds and then reverses for 400 milliseconds. This creates additional space between the robot and the obstacle before the lateral scan begins.
The robot stops again and measures the right side with scanRight(). It then measures the left side with scanLeft(). The two results represent the amount of free space available in each direction.
The condition if (rightScanDistance >= leftScanDistance) makes the robot turn right when the right side is at least as open as the left side. Otherwise, it turns left.
After turning, the robot stops briefly. On the following cycles, if the front path is clear, driveForward() makes it continue moving.
When frontDistance is greater than 20 cm, the obstacle-avoidance sequence is skipped and the robot keeps travelling forward.
At the end of every cycle, frontDistance = readDistance(); updates the front measurement. This new value is used during the next execution of the loop to decide whether the robot should continue or begin an avoidance maneuver.
The complete navigation sequence is therefore: move forward, monitor the front distance, stop when an obstacle is close, reverse, scan both sides, compare the available space, turn toward the clearer direction, and continue moving.
For reliable operation, use a suitable motor driver and a separate power supply capable of providing the motors’ required current. The Arduino, motor driver, sensor, servo, and motor supply must share a common ground. Because a missing ultrasonic echo is interpreted as a clear path, this robot should be considered an educational prototype rather than a safety-critical navigation system. Furthermore, in the current wiring diagram, power is provided by a single standard 9 V battery. In practice, this type of battery is unable to continuously supply the 1–2 A currents required by the motors, resulting in voltage drops and poor system performance. It is therefore recommended to use a high-capacity LiPo battery, combined with an appropriately sized step-up DC-DC converter, capable of ensuring the voltage and current required for the circuit to function correctly.