Weather station
Description
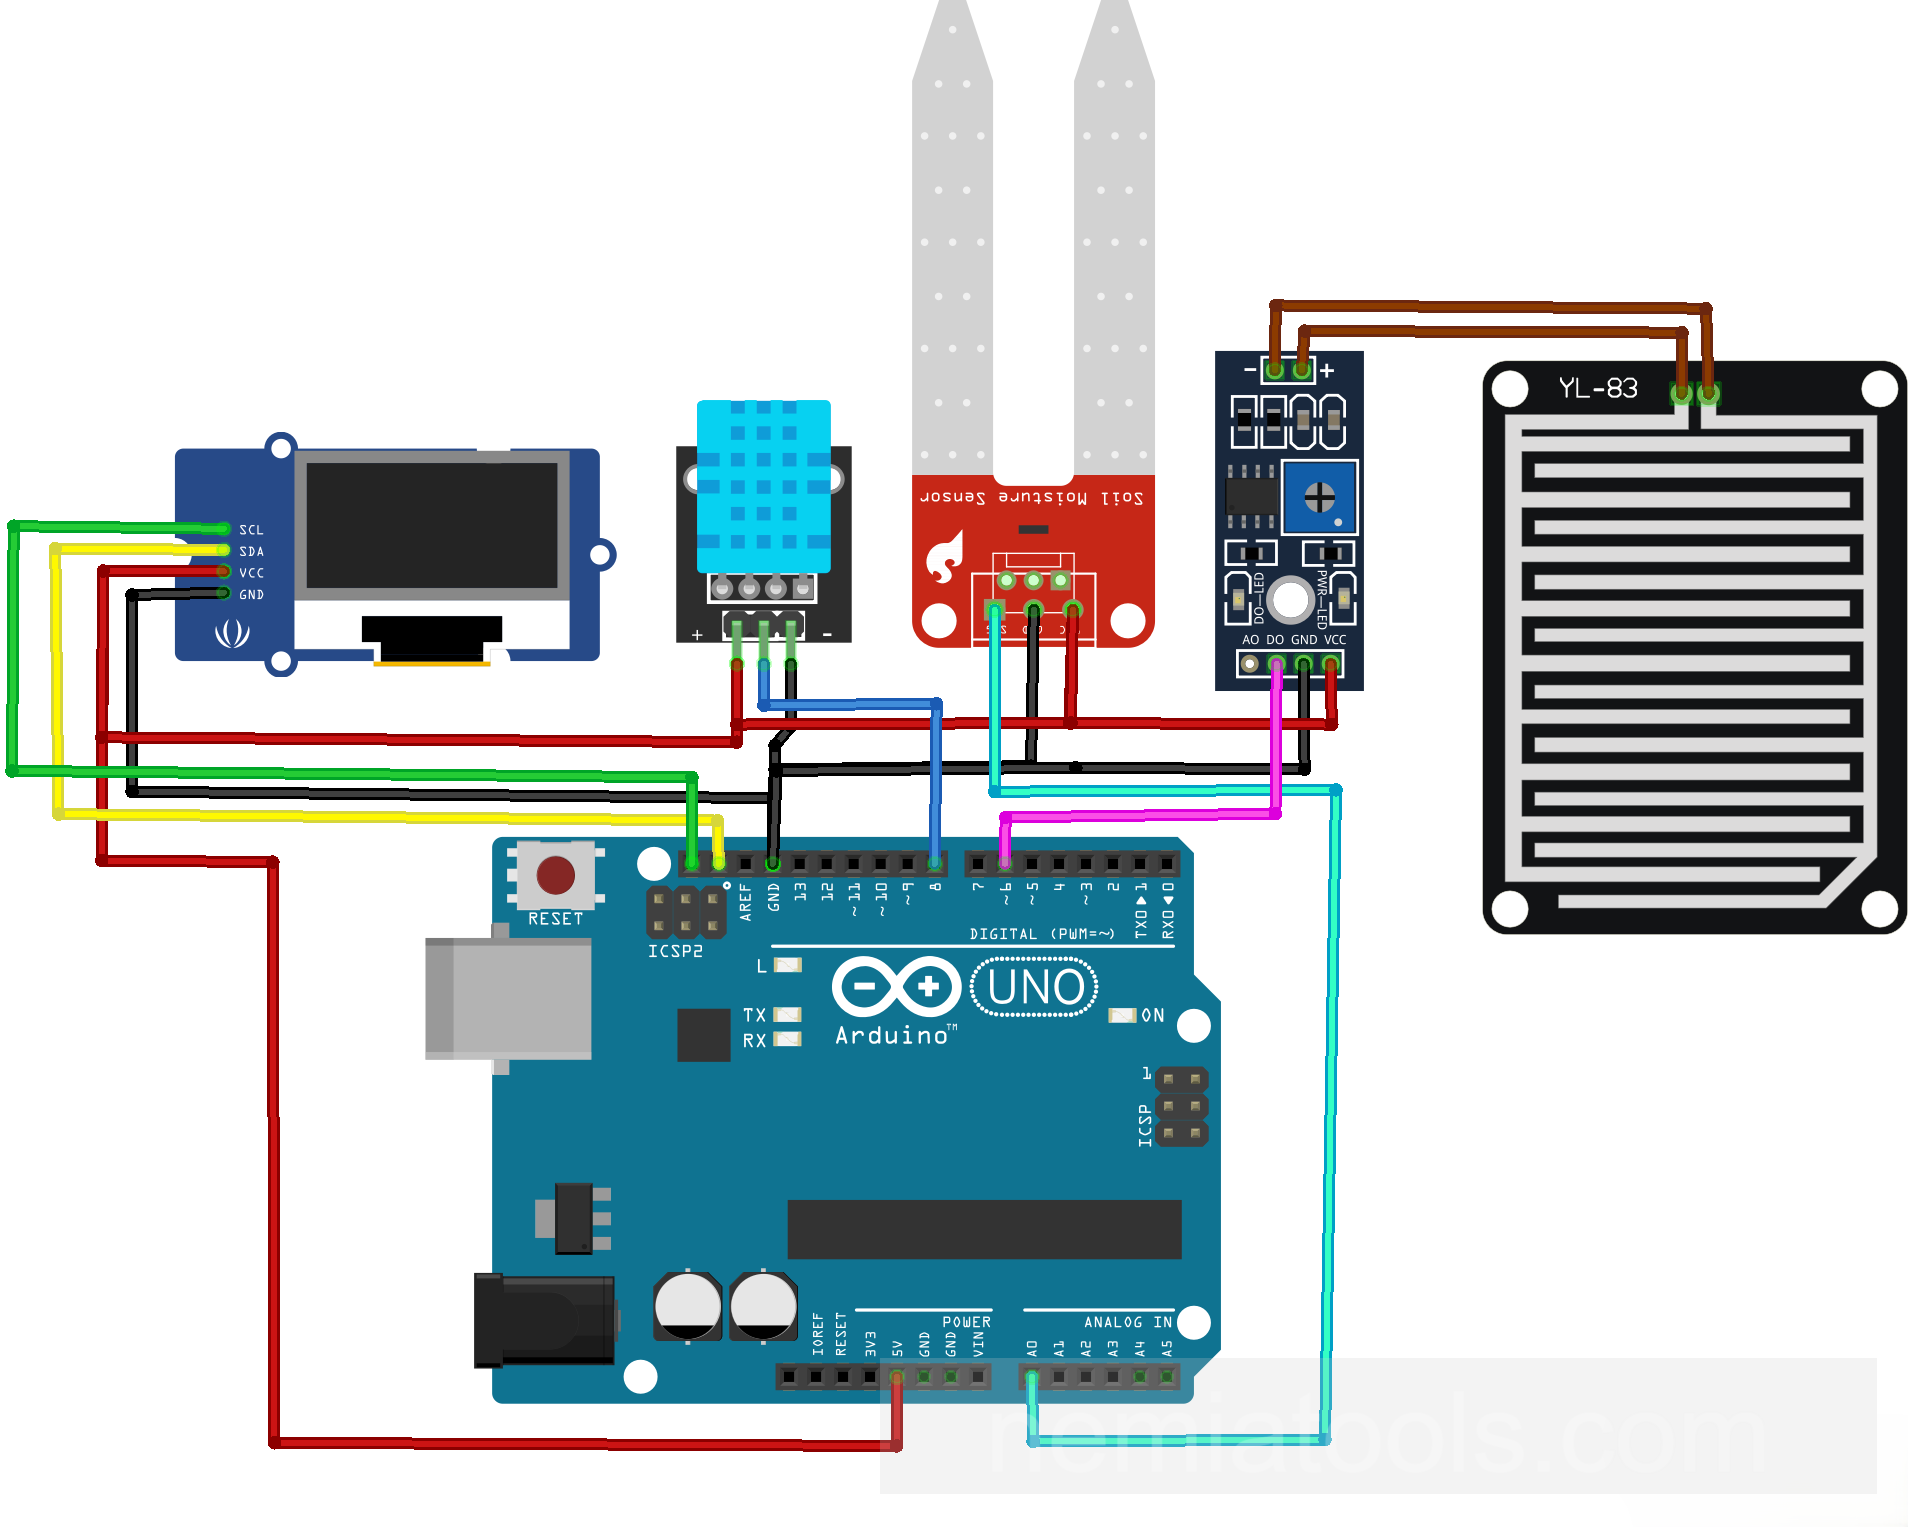
This project is an Arduino weather station built with a DHT22 temperature and humidity sensor, a soil moisture sensor, a rain sensor, and a 128x64 OLED display. The system reads air temperature, air humidity, soil humidity, and rain status, then shows all the values on the OLED screen in a clear and compact interface. The display uses I2C communication, so it only needs two data wires and leaves more Arduino pins available for sensors. This project is useful for learning environmental monitoring, OLED displays, I2C communication, analog sensor reading, digital sensor reading, and Arduino-based weather station systems.
Required components:
- 1x Arduino UNO
- 1x DHT11 temperature and humidity sensor
- 1x FC-28 soil Moisture Sensor (or YL-100)
- 1x FC-37 (or YL-83) rain sensor with LM393-based comparator
- Jumper Cables (and optional breadboard)
Schematic:
CODE:
// https://nemiatools.com
#include <Wire.h> // Include I2C library
#include <Adafruit_GFX.h> // Include graphics library
#include <Adafruit_SSD1306.h> // Include OLED library
#include <DHT.h> // Include DHT library

#define SCREEN_WIDTH 128 // Define OLED width
#define SCREEN_HEIGHT 64 // Define OLED height
#define OLED_RESET -1 // Disable reset pin
Adafruit_SSD1306 display(SCREEN_WIDTH, SCREEN_HEIGHT, &Wire, OLED_RESET); // Create OLED display

#define DHTPIN 8 // Define DHT pin
#define DHTTYPE DHT22 // Define DHT sensor type
DHT dht(DHTPIN, DHTTYPE); // Create DHT object
#define SOIL_PIN A0 // Define soil pin
#define RAIN_PIN 6 // Define rain pin
#define RAIN_ACTIVE LOW // Define rain active state
const int SOIL_DRY = 0; // Set dry value
const int SOIL_WET = 1023; // Set wet value

int readSoilPercent() { // Read soil percentage
  long total = 0; // Store readings sum
  for (byte i = 0; i < 10; i++) { // Repeat ten readings
    total += analogRead(SOIL_PIN); // Add soil reading
    delay(5); // Wait briefly
  }
  int value = total / 10; // Calculate average value
  int percentage = map(value, SOIL_DRY, SOIL_WET, 0, 100); // Convert to percentage
  percentage = constrain(percentage, 0, 100); // Limit percentage range
  return percentage; // Return soil percentage
}

void setup() {
  Wire.begin(); // Start I2C bus
  dht.begin(); // Start DHT sensor
  pinMode(RAIN_PIN, INPUT_PULLUP); // Set rain input
  uint8_t oledAddress = 0x3C; // Store OLED address
  if (!display.begin(SSD1306_SWITCHCAPVCC, oledAddress)) { // Initialize OLED display
    while (true) { // Stop on failure
    }
  }

  display.clearDisplay(); // Clear display buffer
  display.setTextColor(SSD1306_WHITE); // Set text color
  display.setTextSize(1); // Set text size
  display.setCursor(0, 0); // Set text position
  display.println(F("Weather station")); // Print title text
  display.println(F("Starting...")); // Print startup text
  display.display(); // Update OLED screen
  delay(1500); // Wait before loop
}

void loop() {
  float tempC = dht.readTemperature(); // Read Celsius temperature
  float airHumidity = dht.readHumidity(); // Read air humidity
  int soilHumidity = readSoilPercent(); // Read soil humidity
  bool isRaining = digitalRead(RAIN_PIN) == RAIN_ACTIVE; // Read rain state

  display.clearDisplay(); // Clear display buffer
  display.setTextSize(1); // Set text size
  display.setCursor(0, 0); // Set text position
  display.println(F("WEATHER STATION")); // Print screen title
  display.println(F("by nemiatools.com")); // Print author text
  display.println(); // Print empty line

  if (isnan(tempC) || isnan(airHumidity)) { // Check DHT error
    display.println(F("DHT11 error")); // Print DHT error
  } else { // Show valid values
    display.print(F("Temp: ")); // Print temperature label
    display.print(tempC, 1); // Print temperature value
    display.println(F(" C")); // Print Celsius unit
    display.print(F("Air humidity: ")); // Print air label
    display.print(airHumidity, 0); // Print humidity value
    display.println(F(" %")); // Print percent unit
  }

  display.print(F("Soil humidity: ")); // Print soil label
  display.print(soilHumidity); // Print soil value
  display.println(F(" %")); // Print percent unit

  display.print(F("Rain: ")); // Print rain label
  if (isRaining) { // Check rain state
    display.println(F("YES")); // Print rain yes
  } else { // Handle no rain
    display.println(F("NO")); // Print rain no
  }
  display.display(); // Update OLED screen

  delay(2000); // Wait two seconds
}
How it works:
This project works as a small Arduino weather station. It collects data from different sensors and shows the results on a 128x64 OLED display. The system measures temperature, air humidity, soil humidity, and rain detection.
The first important libraries are #include <Wire.h>, #include <Adafruit_GFX.h>, #include <Adafruit_SSD1306.h>, and #include <DHT.h>.
The library Wire.h enables I2C communication. I2C is the communication protocol used by the OLED display. It allows the Arduino to control the display using only two main communication wires: SDA and SCL. This is very useful because it keeps the wiring simple and saves Arduino pins for other sensors.
The library Adafruit_GFX.h is the general graphics library. It provides the basic drawing and text functions used by Adafruit displays, such as setting the cursor position, changing text size, printing text, and managing simple graphics.
The library Adafruit_SSD1306.h is the specific driver library for OLED displays based on the SSD1306 controller. The SSD1306 is the chip that manages many common 128x64 OLED displays. This library tells the Arduino how to initialize the display and how to send text or graphics to it.
The library DHT.h allows the Arduino to communicate with DHT temperature and humidity sensors. In this code, the selected sensor type is the DHT22, which can measure both air temperature and air humidity.
The lines #define SCREEN_WIDTH 128 and #define SCREEN_HEIGHT 64 define the OLED resolution. This means the display has 128 pixels horizontally and 64 pixels vertically. The line #define OLED_RESET -1 means that the OLED reset pin is not used separately by the Arduino.
The line Adafruit_SSD1306 display(SCREEN_WIDTH, SCREEN_HEIGHT, &Wire, OLED_RESET); creates the OLED display object. It tells the program that the display is 128x64 pixels and that it communicates through the I2C bus managed by Wire.
One important thing about this OLED library is that it uses a display buffer. When the code writes text with functions like display.print() or display.println(), the text is first prepared in memory. The real OLED screen is updated only when the code calls display.display();. This makes the screen update cleaner and avoids partial or flickering text.
The lines #define DHTPIN 8 and #define DHTTYPE DHT22 define the DHT sensor pin and sensor model. The line DHT dht(DHTPIN, DHTTYPE); creates the DHT sensor object, so the Arduino can read temperature and humidity from pin 8.
The line #define SOIL_PIN A0 defines the analog pin used by the soil moisture sensor. This sensor gives an analog value that changes depending on how wet or dry the soil is.
The lines #define RAIN_PIN 6 and #define RAIN_ACTIVE LOW define the rain sensor input. In this project, rain is detected when the rain sensor output becomes LOW. This is why the code later checks if the digital reading is equal to RAIN_ACTIVE.
The values const int SOIL_DRY = 0; and const int SOIL_WET = 1023; are used to convert the soil sensor reading into a percentage. In this code, 0 means completely dry and 1023 means completely wet.
The function int readSoilPercent() reads the soil moisture level and converts it into a percentage. Instead of using only one reading, the code takes ten readings with analogRead(SOIL_PIN) and calculates the average. This makes the result more stable and reduces small random variations from the sensor.
The line int percentage = map(value, SOIL_DRY, SOIL_WET, 0, 100); converts the raw analog value into a percentage from 0% to 100%. Then percentage = constrain(percentage, 0, 100); makes sure the final value never goes below 0 or above 100.
Inside setup(), the line Wire.begin(); starts the I2C bus, so the Arduino can communicate with the OLED display. The line dht.begin(); starts the DHT22 sensor.
The line pinMode(RAIN_PIN, INPUT_PULLUP); configures the rain sensor pin as an input with the Arduino internal pull-up resistor enabled. This means the pin normally stays HIGH, and it becomes LOW when the rain sensor activates.
The line uint8_t oledAddress = 0x3C; stores the I2C address of the OLED display. Many SSD1306 OLED displays use the address 0x3C. The line display.begin(SSD1306_SWITCHCAPVCC, oledAddress) initializes the OLED using that address.
If the OLED display is not found, the code enters while (true) and stops there. This prevents the rest of the program from running without a working display.
The startup screen is created with display.clearDisplay();, display.setTextColor(SSD1306_WHITE);, display.setTextSize(1);, and display.setCursor(0, 0);. These lines clear the buffer, set white text, choose the text size, and place the cursor at the top-left corner.
The lines display.println(F("Weather station")); and display.println(F("Starting...")); write the startup text into the display buffer. The line display.display(); finally sends the buffer to the OLED screen, making the text visible.
Inside loop(), the line float tempC = dht.readTemperature(); reads the temperature in Celsius. The line float airHumidity = dht.readHumidity(); reads the air humidity percentage.
The line int soilHumidity = readSoilPercent(); reads the soil moisture sensor and converts the value into a percentage. The line bool isRaining = digitalRead(RAIN_PIN) == RAIN_ACTIVE; checks if the rain sensor is active.
Before printing new values, the code uses display.clearDisplay();. This clears the previous screen content from the buffer, so the new readings can be shown clearly.
The display then prints the title with display.println(F("WEATHER STATION")); and the author text with display.println(F("by nemiatools.com"));.
The condition if (isnan(tempC) || isnan(airHumidity)) checks if the DHT22 reading failed. If the sensor does not return valid values, the OLED shows an error message. Otherwise, the code prints the temperature and air humidity values on the display.
The soil humidity is printed with display.print(F("Soil humidity: ")), display.print(soilHumidity), and display.println(F(" %")). This shows the soil moisture as a simple percentage.
The rain status is printed with display.print(F("Rain: ")). If isRaining is true, the display shows YES. Otherwise, it shows NO.
The line display.display(); is essential because it updates the physical OLED screen with all the text prepared in the buffer. Without this line, the values would be written in memory but would not appear on the display.
Finally, delay(2000); waits two seconds before taking new readings. This gives the screen a stable refresh rhythm and avoids updating the weather data too quickly.
Overall, the Arduino reads the environmental sensors, prepares the information in the OLED display buffer, and refreshes the screen every two seconds. The OLED display makes the project compact and readable, while the I2C interface keeps the wiring simple and leaves more pins available for future sensors or modules.
For real use, the soil sensor values may need calibration. Some soil moisture sensors give higher values when wet, while others give lower values when wet. If the percentage appears reversed, the values of SOIL_DRY and SOIL_WET should be swapped or adjusted.
Future development:
This project could be expanded by adding an anemometer to measure wind intensity and display the wind speed on the OLED screen. Another useful improvement would be to use the analog output of the rain sensor instead of only the digital output, so the system could detect not only if it is raining, but also the intensity of the rain. With these additions, the project would become a more complete weather station capable of monitoring temperature, humidity, soil moisture, rain level, and wind conditions.